# Artwork Management
# Artwork Basics
### Scale
### Bleed
#### Trim Bleed
#### Finish Bleed
### Dots Per Inch
Dots Per Inch is the measure of how many dots there are per inch of printed material. The higher the number of dots the higher the quality of print. **It is used to express either the quality a print is printed at or an Image's Resolution.**
A good way of visualising this is the diagram below.
[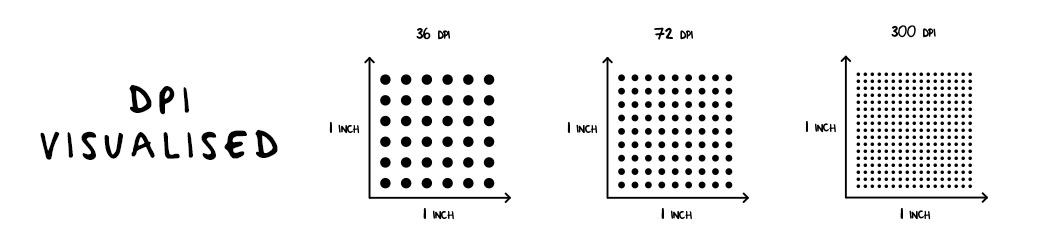](https://manual.maticmedia.co.uk/uploads/images/gallery/2022-05/image-1652864941162.png)
### Minimum Recommend Artwork Dpi
**Work Type**
**Minimum DPI**
**Business Cards & Leaflets**
300dpi
**A0 Poster and Bigger**
100dpi
Though we can print at lower resolutions depending on the [viewing distance](#bkmrk-viewing-distance-vs-) we always recommend a minimum DPI of 100
### Dpi at Scale
**Scale**
**Multiply DPI / Scale By**
**Example**
25%
4
33%
3
10%
10
1%
100
### Viewing Distance vs DPI
**Viewing Distance**
**Min Resolution**
0.6m / 2ft
300 dpi
1m / 3.3ft
180 dpi
1.5m / 5ft
120 dpi
2m / 6.5ft
90 dpi
3m / 10ft
60 dpi
5m / 16ft
35 dpi
10m / 33ft
18 dpi
15m / 50ft
12 dpi
50m / 160ft
4 dpi
60m / 200ft
3 dpi
200m / 650ft
1 dpi
### Low Resolution vs High Resolution
Low resolution is another way of saying low DPI or poor quality. High Resolution is another way of saying high DPI or high quality.
The images below show a high DPI (High Resolution) vs a low DPI (Low Resolution) image.
While you can convert a low resolution image to a high resolution image, **You cannot convert a Low Resolution image to a High Resolution.** There is an alternative called **upscaling**, which you can read about below.
[](https://manual.maticmedia.co.uk/uploads/images/gallery/2022-05/image-1652865127494.png)
### Upscaling Images
Upscaling is the process of converting an image from Low Resolution to High Resolution. Basic upscaling is the simplest way of stretching a lower resolution image onto a larger display. Pixels from the lower resolution image are copied and repeated to fill out all the pixels of the higher resolution display.
More advance processes include Dithering (blurring the dots as you enlarge so you don't get a block effect) or AI (using computer prediction based on the surrounding dots to predict what the image should look like at a larger size).
# Uploading Artwork
### Where do you upload files...
You can upload files on the artwork management screen. This is accessible from the Customer Portal Cart Screen or the Customer Viewing Quote Screen.
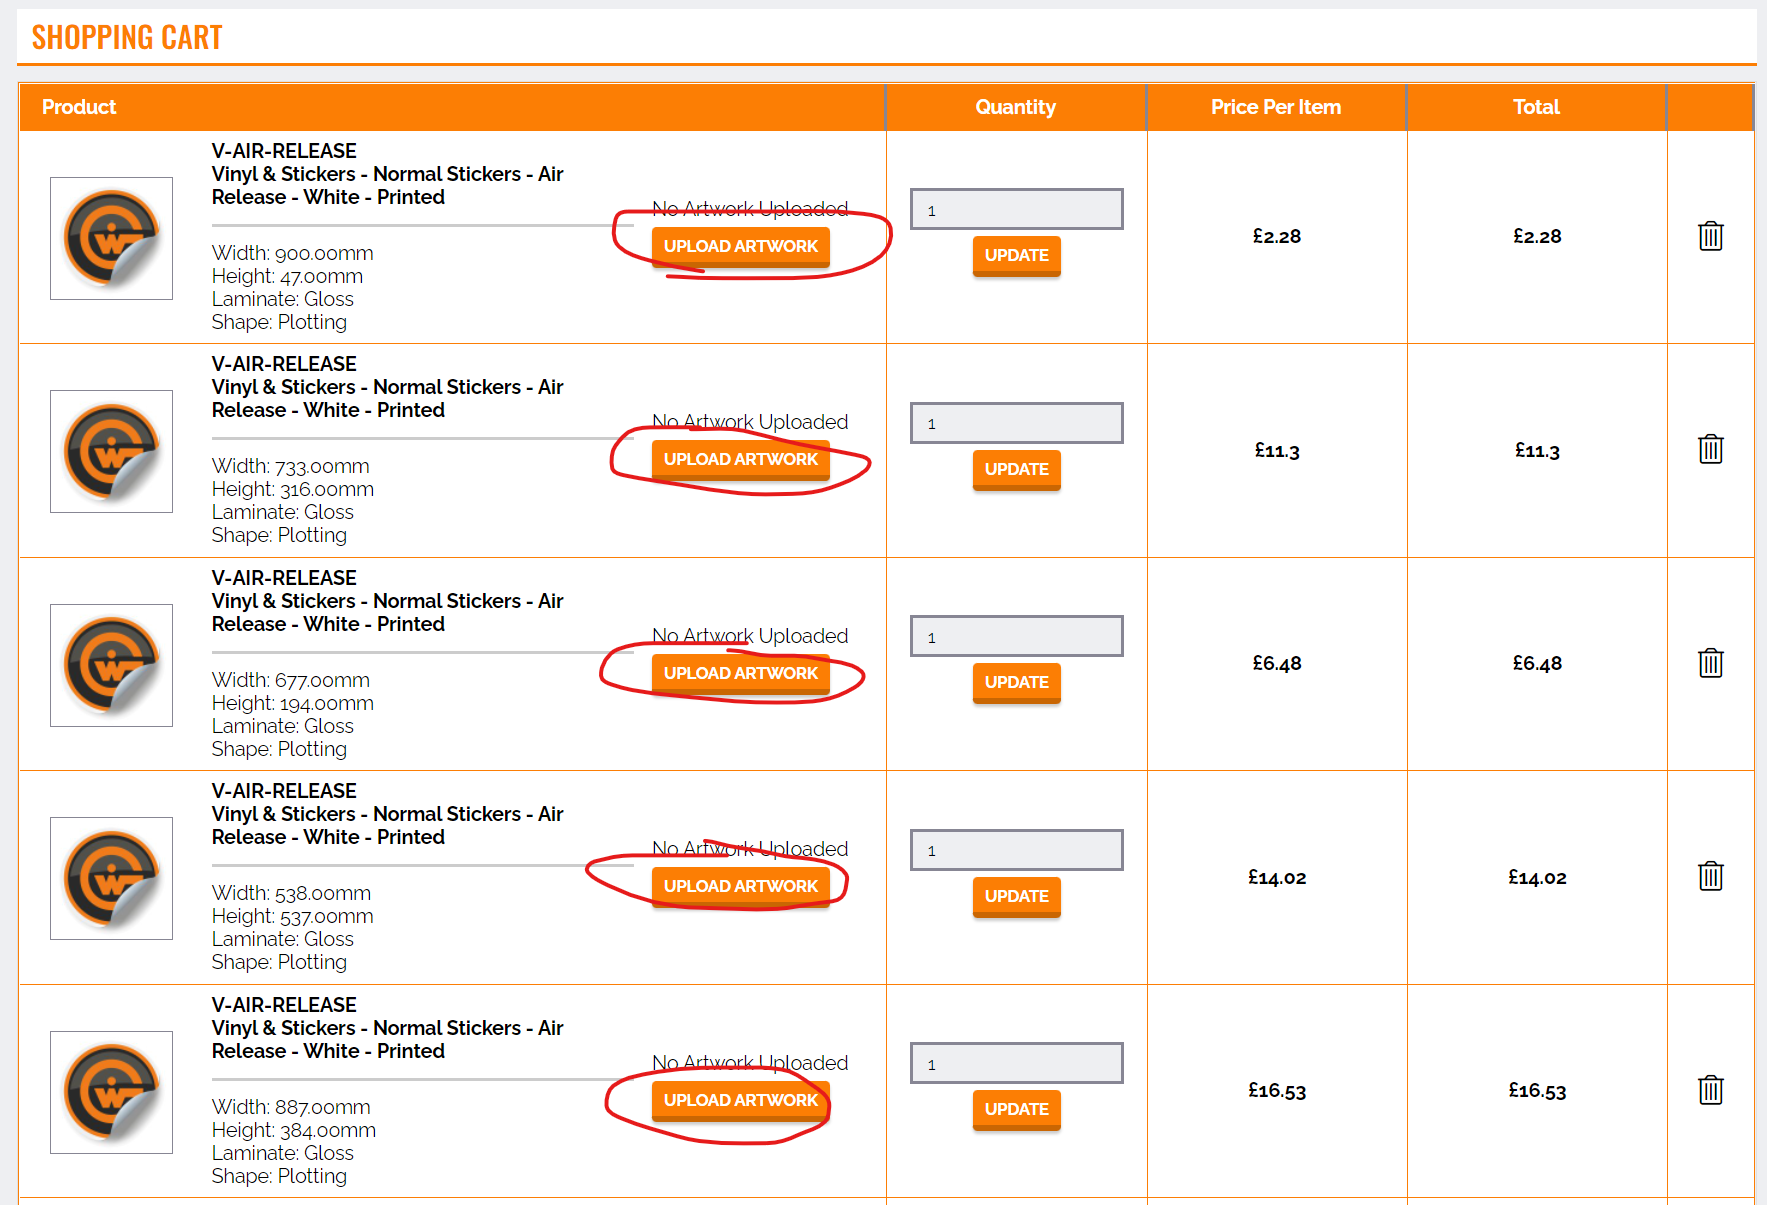
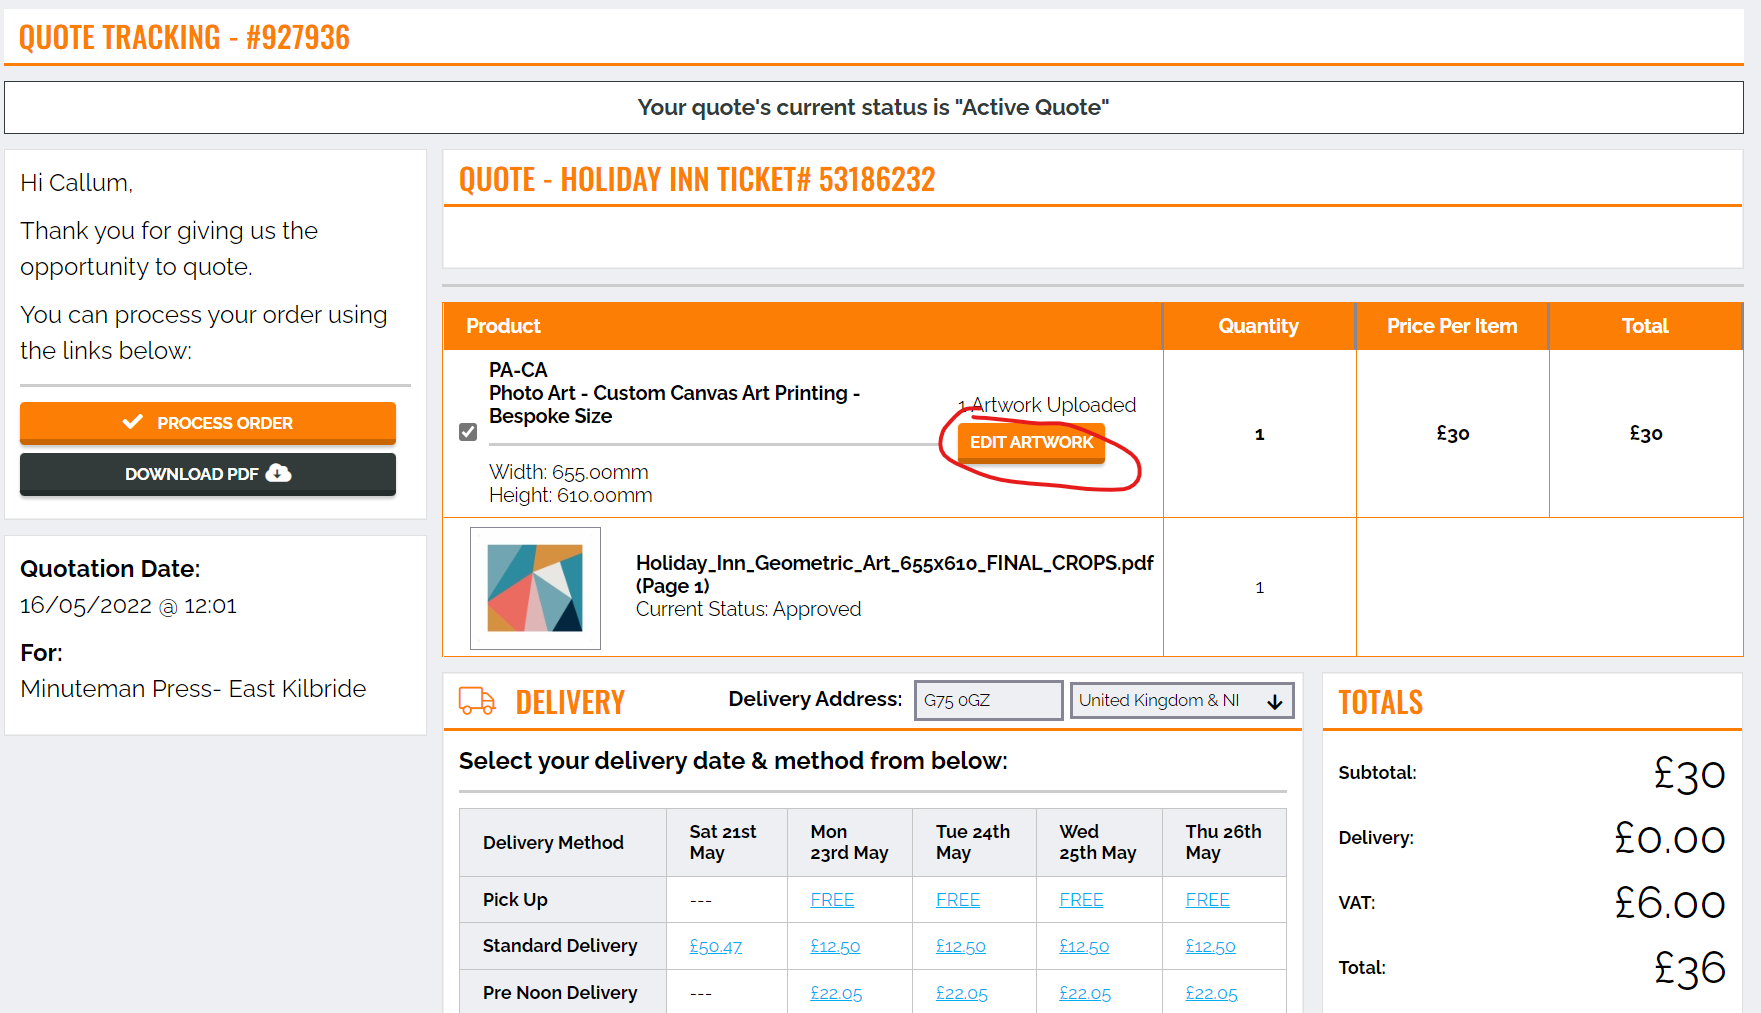
#### How to get to the Customer Cart Screen
1. Go to a Cart the MaticTrack
2. Click on the **"Cart View"** button
[](https://manual.maticmedia.co.uk/uploads/images/gallery/2022-05/image-1652786973718.png)
3. Click on the **"Edit Artwork"** button on the size you want to upload/edit artwork on
EACH SIZE HAS ITS OWN EDIT ARTWORK BUTTON
[](https://manual.maticmedia.co.uk/uploads/images/gallery/2022-05/image-1652787054296.png)
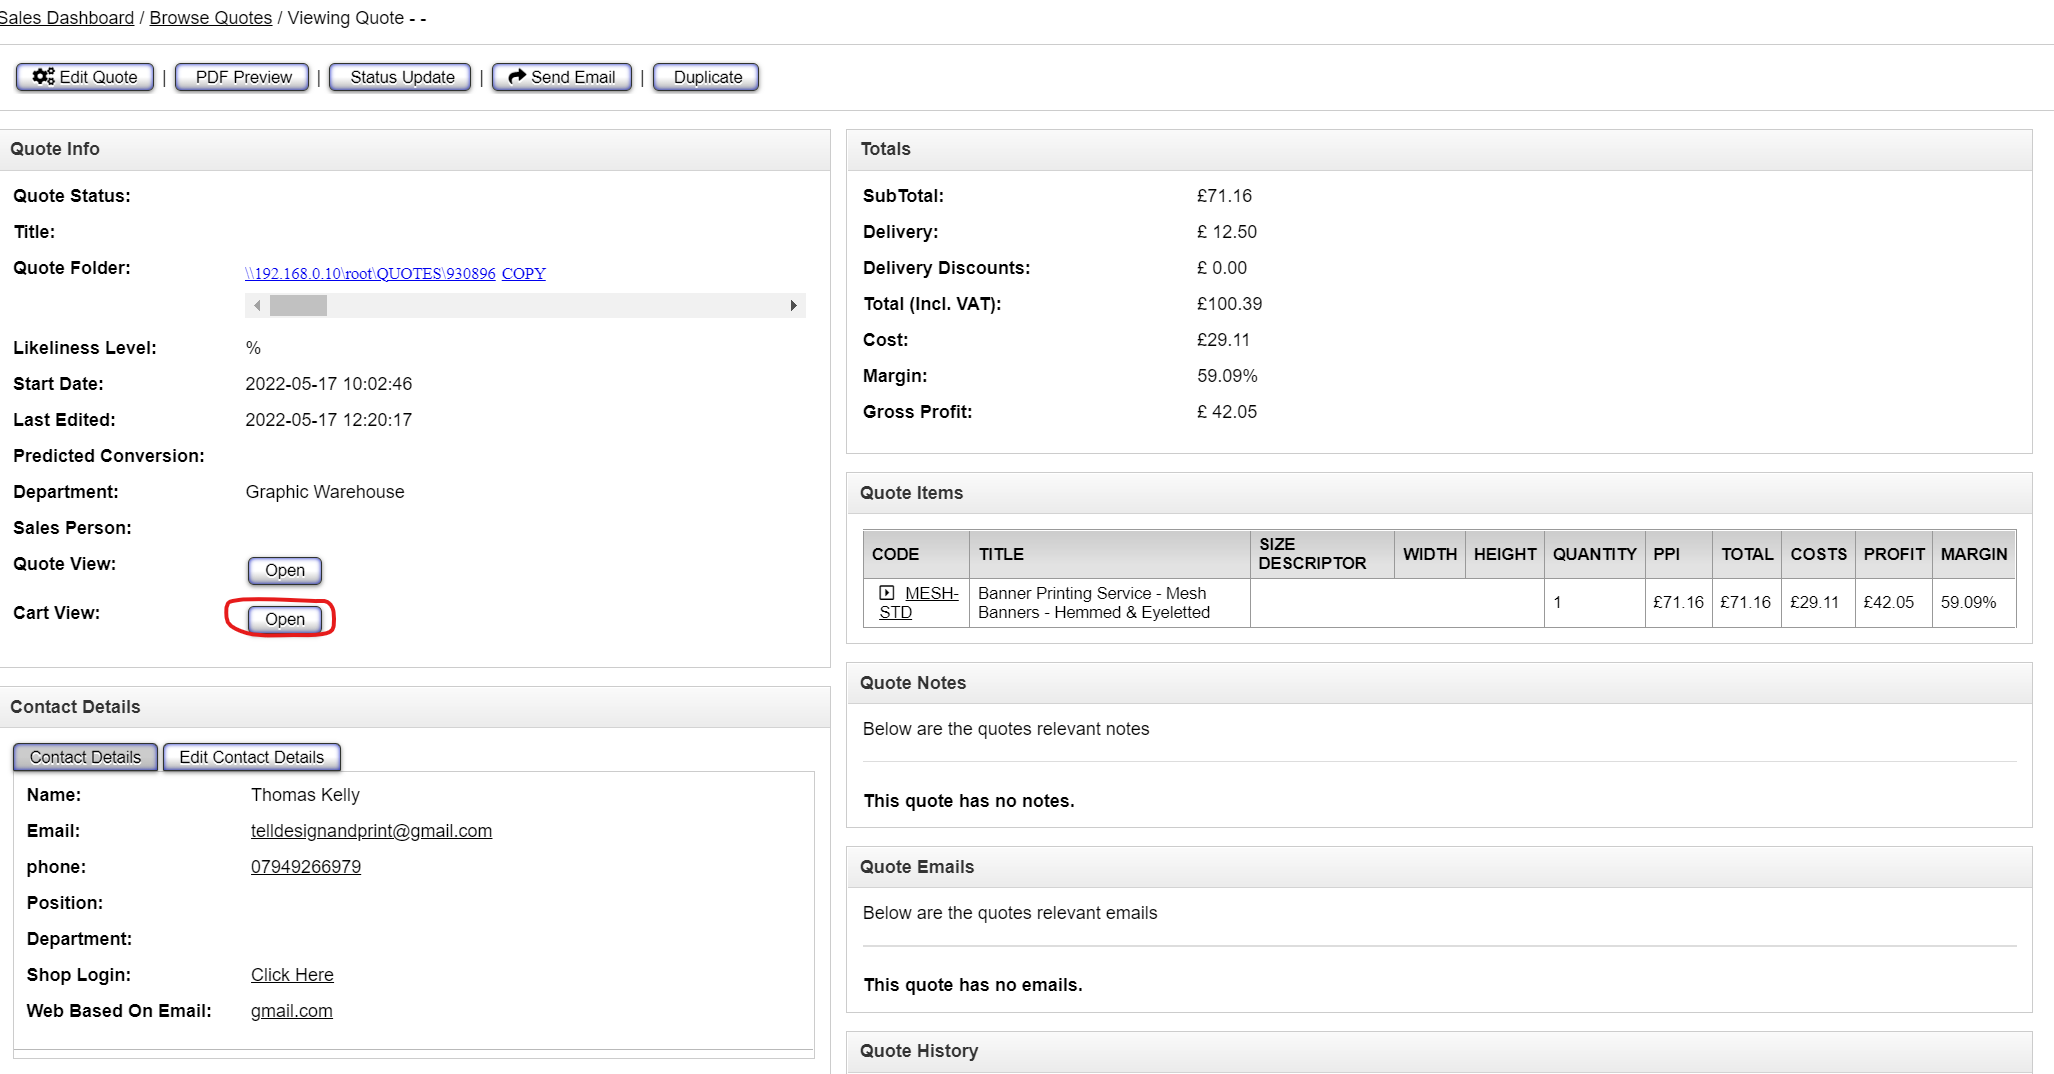
#### How to get to the Customer Quote Screen
1. Go to a Quote on the MaticTrack
2. Click the ****Quote View button as below**** [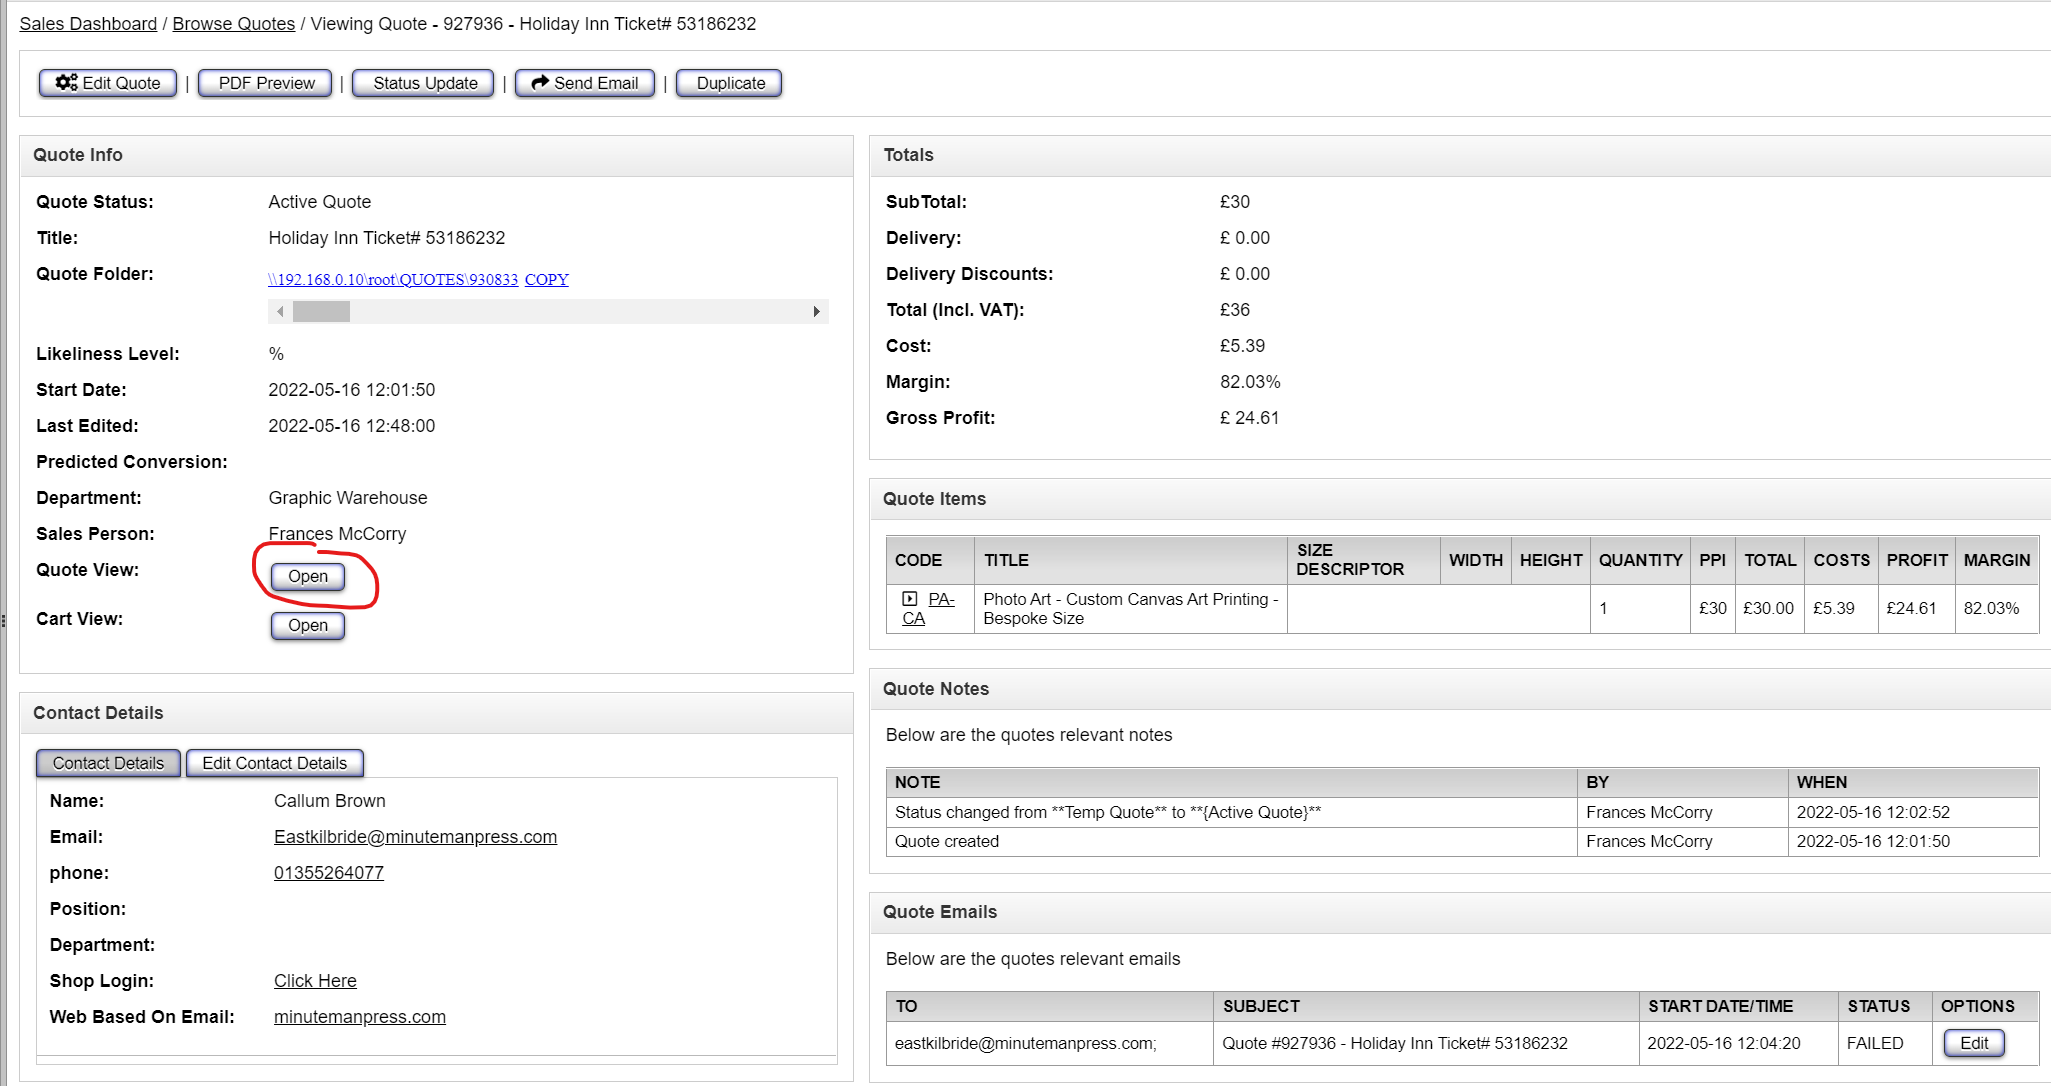](https://manual.maticmedia.co.uk/uploads/images/gallery/2022-05/image-1652786481157.png)
3. Click on the **"Edit Artwork" button** for the item you want to upload the artwork for.
EACH SIZE HAS ITS OWN EDIT ARTWORK BUTTON
[](https://manual.maticmedia.co.uk/uploads/images/gallery/2022-05/image-1652786544366.png)
### What kind of files can you upload...
The MaticTrack accepts the following file types
PDF
EPS
PNG
JPEG (JPG)
TIFF
WORD
PPT (Powerpoint)
#### Maximum File Size
The system will accept file uploads of up to **1 Gigabytes in size.**
### What happens when you upload a file...
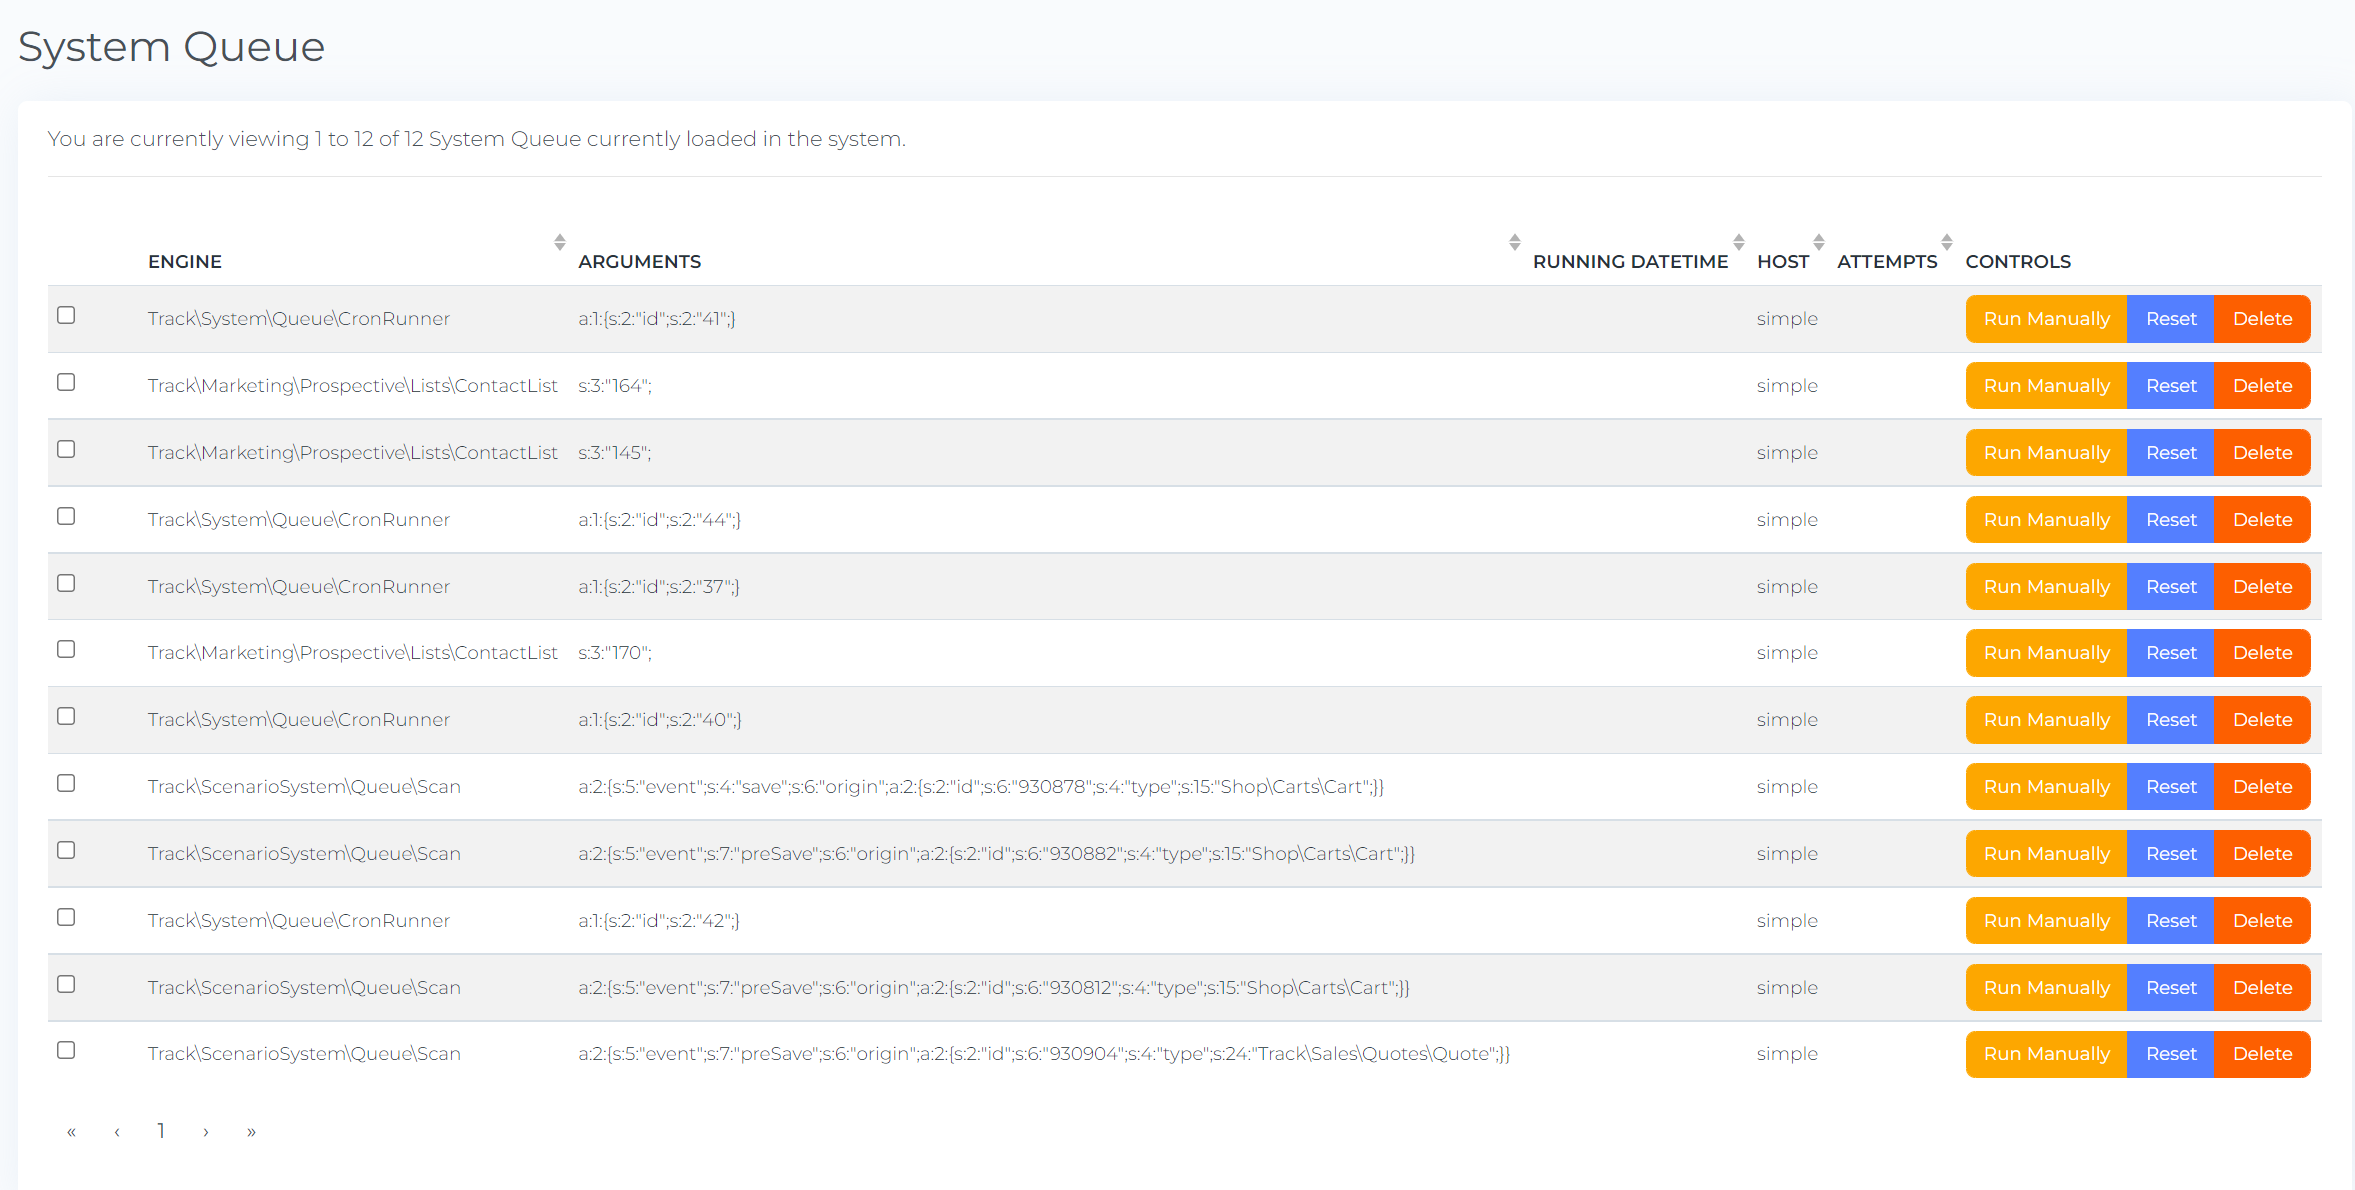
### The Queue
The system queue is exactly that, a queue of jobs that the system processes in the background. Examples are sending emails, preflighting artwork, generating proofs, generating print files.
This keeps the system running fast as it runs in the background.
#### Monitoring the Queue
If you have the proper permissions you can monitor the queue from here: [System Queue - MaticTrack (maticmedia.co.uk)](https://crm.maticmedia.co.uk/system/queue)
[](https://manual.maticmedia.co.uk/uploads/images/gallery/2022-05/image-1652786392674.png)
### What Does Pre-Flighting Artwork Mean?
When uploading a file your file will be put into a processing queue where it will be automatically split into individual pages and then checked for quality against these parameters...
- Page Width
- Page Height
- Estimated Scale
- Maximum Recommended Scale
- Includes Images
- If images are included it will calculate DPI
- Fonts
- Minimum Font Size
- RGB mix Colours
- Spot Colours
- CMYK mix Colours
- Bleeds
At the same time it'll generate a CMYK jpeg proof for display in the artwork approval process.
Depending on the size / complexity of the file this can be quite an intensive process and may take up to 5 minutes.
### What Does Proofing Artwork Mean?
This basically means converting the artwork into a jpeg that can be displayed to the user. This is also known as Image Rasterization.
Depending on the size / complexity of the file this can be quite an intensive process and may take up to 5 minutes.
#### Size vs Complexity
Just because a file is small does not mean it is not complex, **an architecturual drawing is a much more complex than a 1 gigabyte image.**
### Uploading Artwork
[](https://manual.maticmedia.co.uk/uploads/images/gallery/2022-05/image-1652866190708.png)
[](https://manual.maticmedia.co.uk/uploads/images/gallery/2022-05/image-1652866287957.png)
1. Artwork Status
2. File Proof
### Artwork Proofing and Approving (Artwork Approval Process)
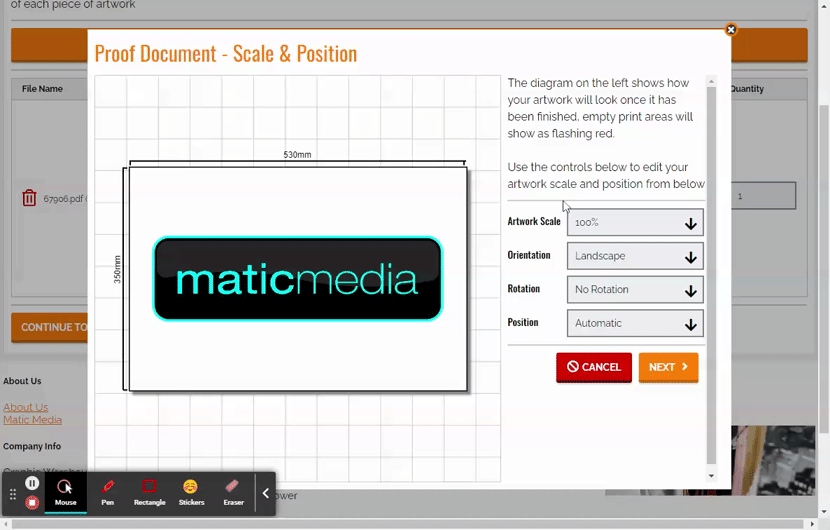
#### Step 1: Scale & Position
##### Artwork Scale
**Method**
**What it does...**
Scale to Bleed Width
Scales the artwork up to the width of the artboard including the bleed
Scale to Bleed Height
Scales the artwork up to the height of artboard including the bleed
Scale to Finish Width
Scales the artwork up to the width of the artboard, not including the bleed
Scale to Finish Height
Scales the artwork up to the width of the artboard, not including the bleed
A Paper Scale up 1
Scales the artwork 141% used for scaling A Sized documents e.g. A2 to A1
A Paper Scale up 3
Scales the artwork 283% used for scaling A Sized documents e.g. A4 to A1
100%
Does not scale the artwork
400%
Scales the artwork 400%
1000%
Scales the artwork 1000%
Custom Scale
Allows you to pick the width and height of the artwork
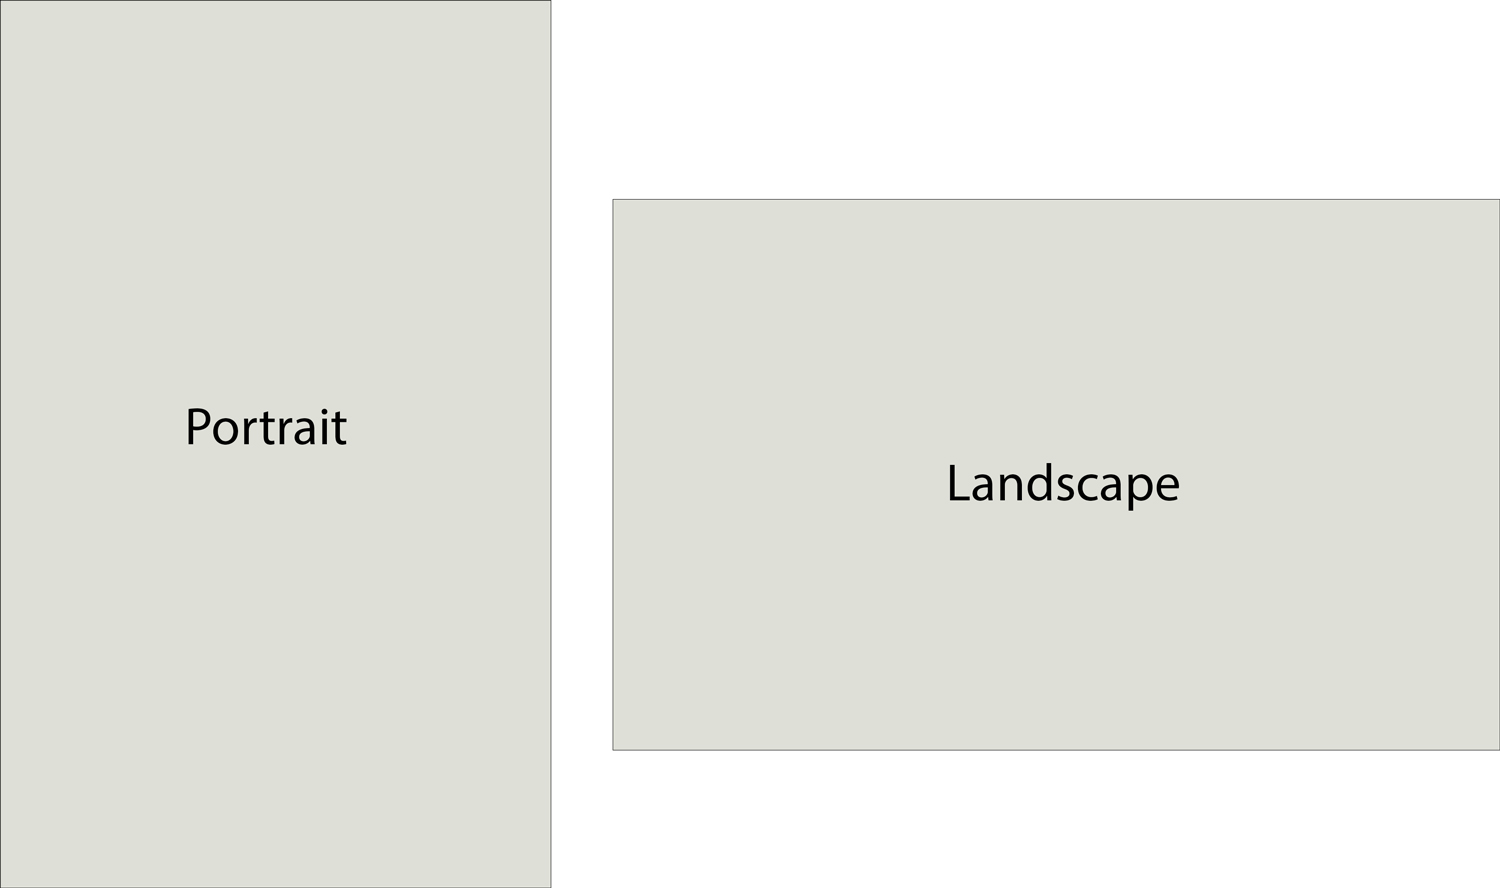
##### Orientation
Allows you to select the orientation of the **ARTBOARD.**
[](https://manual.maticmedia.co.uk/uploads/images/gallery/2022-05/image-1652867364862.png)
[](https://manual.maticmedia.co.uk/uploads/images/gallery/2022-05/artwork-management-for-rigid-board-printing-direct-to-board-mdf-18mm-single-sided-x-1-graphic-warehouse.gif)
##### Rotation
Rotates the **ARTWORK**
**[](https://manual.maticmedia.co.uk/uploads/images/gallery/2022-05/artwork-management-for-rigid-board-printing-direct-to-board-mdf-18mm-single-sided-x-1-graphic-warehouse-1.gif)**
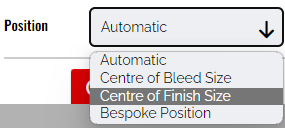
##### Position
**Operation**
**What it does....**
**Automatic**
Automatically tries to calculate where the artwork should be placed assuming equal registration points around the artwork.
**Centre of Bleed Size**
Centers the artwork in the middle of the artboard **including the bleeds**
**Center of Finish Size**
Centers the artwork in the middle of the artboard **not including the bleeds**
**Bespoke**
Allows you to drag and drop the artwork where you want or put in a specific X and Y Coordinate (0,0 is at top left)
#### [](https://manual.maticmedia.co.uk/uploads/images/gallery/2022-05/artwork-management-for-rigid-board-printing-direct-to-board-mdf-18mm-single-sided-x-1-graphic-warehouse-2.gif)
#### Step 2: Artwork Bleeds
#### Step 3: Preflight Warnings
Shows any warnings, hover over the information icon to find out what each warning means
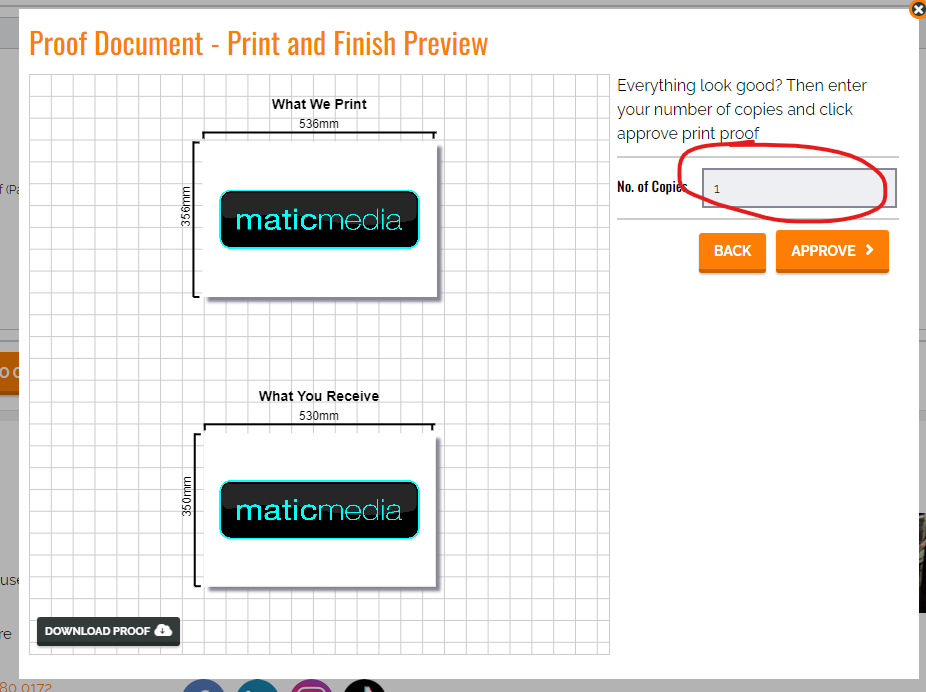
#### Step 4: Prepress Proof and Quantity
Shows you what we are going to print and what is going to be finished.
You can enter the quantity of each artwork here too.
[](https://manual.maticmedia.co.uk/uploads/images/gallery/2022-05/image-1652868694551.png)
# Adding Cut Lines / Digital Cut Marks
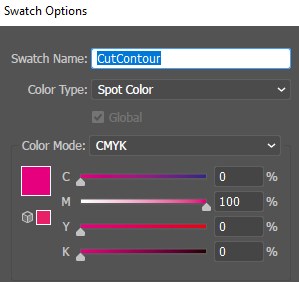
#### To add a Cut Line, the cut requires:
- A single vector line (not expanded or it will be cut twice).
- Swatch name: **CutContour**
- Colour Type: **Spot Colour**
- Swatch colour: C:0 M:100 Y:0 K0 (CMYK) *This can be any colour but we tend to use 100% magenta.*
[](https://manual.maticmedia.co.uk/uploads/images/gallery/2022-07/image-1657721039389.png)
- Layer name: **Cut**
[](https://manual.maticmedia.co.uk/uploads/images/gallery/2023-11/image-1700042216151.png)
- Stroke Size: N/A (this can be any size)
**Save as the latest version of pdf.**
[](https://manual.maticmedia.co.uk/uploads/images/gallery/2023-11/image-1700042258433.png)
**Make sure this box is ticked.** *Otherwise you'll get digital cut-line errors when uploading.*
[](https://manual.maticmedia.co.uk/uploads/images/gallery/2023-11/image-1700042308734.png)
If there are a lot of nodes, it can be beneficial to simplify the nodes to speed up production.
[](https://manual.maticmedia.co.uk/uploads/images/gallery/2022-07/image-1657721470842.png)
# Adding Drill Holes
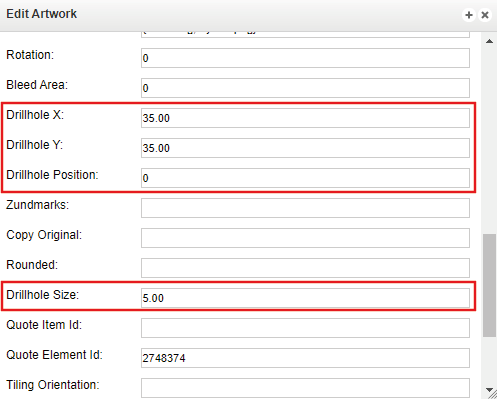
### Using the Automatic Drill Hole Positioning System in Artwork System
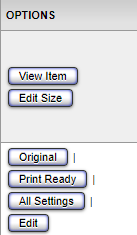
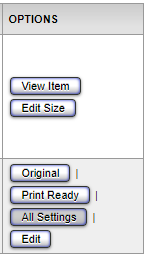
Using matic track, when viewing an order, select 'edit' to change the individual settings of that artwork. Use 'All Settings' to change all artworks of the same size and product.
[](https://manual.maticmedia.co.uk/uploads/images/gallery/2022-09/image-1662368409506.png)
Changing the 'Drillhole X' changes the measurement in millimetres along the X axis \[landscape\]
Changing the 'Drillhole Y' changes the measurement in millimetres along the Y axis \[vertical\]
Drillhole Position is saved as presets, so each number has different layouts:
- Position 1: 1 drillhole in each of the 4 corners.
- Position 2: 1 drillhole in each of the top 2 corners.
- Position 3: 1 drillhole in the top left corner.
- Position 4: 3 drillholes on the left side and 3 drill holes on the right side.
- Position 5: 3 drillholes on the top side and 3 drill holes on the bottom side.
Drillhole Size is the radius of the hole in millimetres. If you need a 5mm hole, enter '2.5'.
Select the 'Save' button when you scroll down in the same box, now check the [](https://manual.maticmedia.co.uk/uploads/images/gallery/2022-09/image-1662372816942.png) print-ready file to see the drill holes on the artwork.
[](https://manual.maticmedia.co.uk/uploads/images/gallery/2022-09/image-1662373034725.png)
### Setting Up Drill Holes in Artwork via Corel Draw / Illustrator
#### Setting Up Bespoke Drill Holes Position in Customer Portal (AKA Graphic Warehouse)
The Customer Portal accepts DrillHoles as a layer called "DrillHoles"
Drillholes can be made as a 'CutContour' line, see instructions linked: [Adding Cut Lines / Dig... | Matic Manual (maticmedia.co.uk)](https://manual.maticmedia.co.uk/books/artwork-management/page/adding-cut-lines-digital-cut-marks)
#### Setting Up Drill Holes for Zund Cut Center
The Zund Cut Center accepts DrillHoles as a layer called "DrillHoles"
####
#### Setting Up Drill Holes for Onyx Thrive
When setting up for Onyx Thrive you should set up drill holes as a spot colour called CutContour
# Curved Corners / Rounded Corners
Rounded Corners can be made manually as a 'CutContour' in the same way you would [make a cut line.](https://manual.maticmedia.co.uk/books/artwork-managment/page/adding-cut-lines-digital-cut-marks)
The rounded corners can quickly be changed in 'Edit' or 'All Settings' within the Items section on the order page within Matic Track.
[](https://manual.maticmedia.co.uk/uploads/images/gallery/2022-08/image-1661778256171.png)
You'll find it when you scroll down in the pop-up section of All Settings.
For example type "5" this will give you a radius of 5mm rounded corners.
[](https://manual.maticmedia.co.uk/uploads/images/gallery/2022-08/image-1661778358835.png)
Hit Save
[](https://manual.maticmedia.co.uk/uploads/images/gallery/2022-08/image-1661779037243.png)
Check your file in the Print Ready file.
[](https://manual.maticmedia.co.uk/uploads/images/gallery/2022-08/image-1661779336286.png)
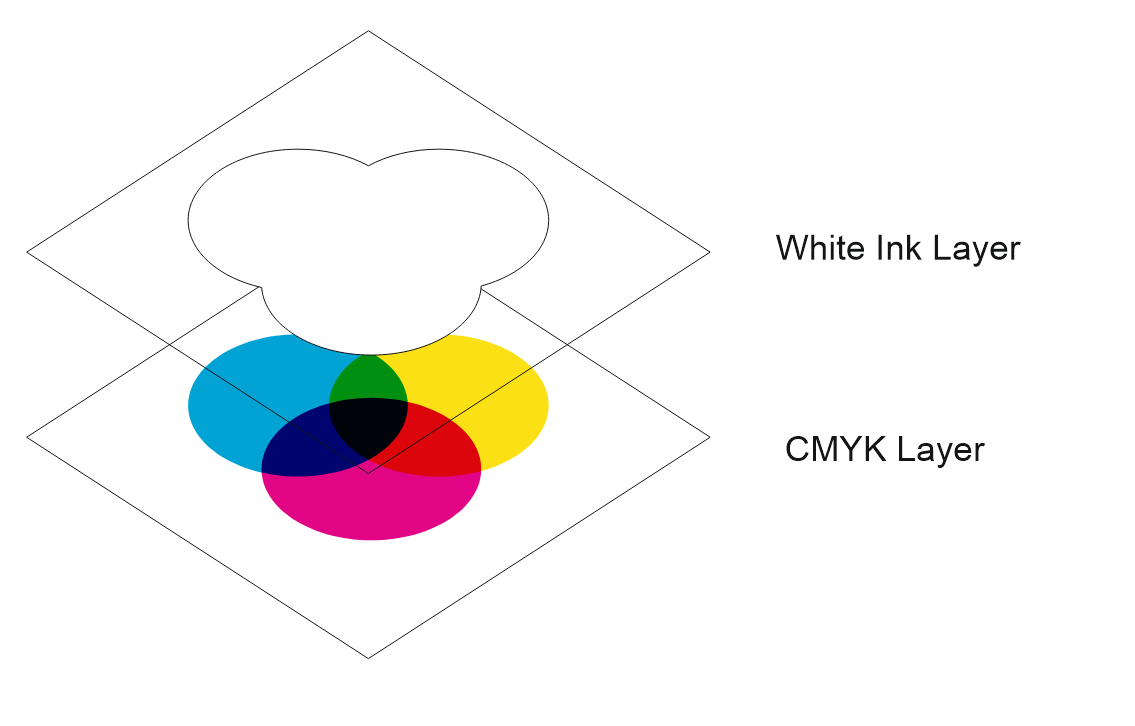
# Setting up artwork with White Ink
### How to add White Ink to a Print Job...
White ink jobs are setup on the same file as your artwork but on a new layer as a spot colour.
### Rules for white ink jobs
- White Ink should be represented with the spot colour "Spot1"
- White Ink can be a gradient or solid colour by adding a 50% on to the spot colour
- White Ink layer must always be placed at the very top of the CMYK prints and named "Spot1"
- White Ink must be set to "Overprint Fill" and "Overprint outline" to true
### White Ink = Spot1
White ink must be named a **spot colour with the exact naming "Spot1"** for Onyx Thrive to recognise it.
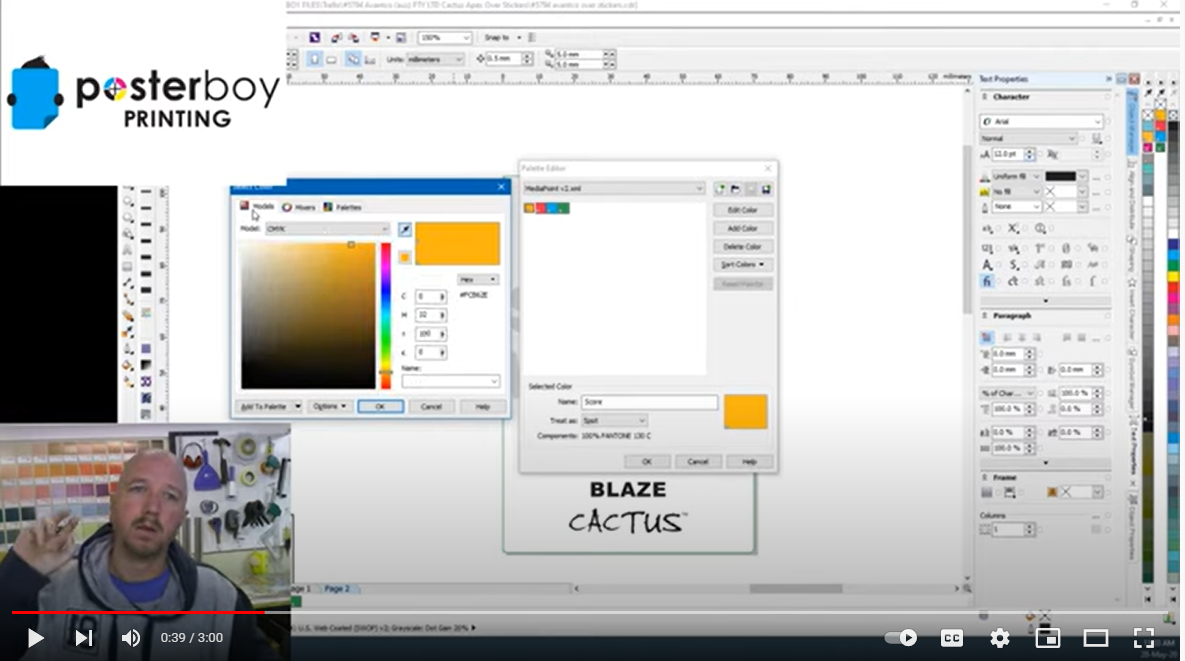
### Creating Spot1 in CorelDraw
Watch the video here: https://www.youtube.com/watch?v=l4nOxxnj8-E
[](https://manual.maticmedia.co.uk/uploads/images/gallery/2022-06/image-1654781385424.png)
### White Ink must be the top layer
**The white ink layer must be the top layer even if the white ink is being printed below the CMYK layer.**
[](https://manual.maticmedia.co.uk/uploads/images/gallery/2022-05/image-1652708032650.png)
### White Ink must be set to Overprint Fill and Overprint Outline
#### Overprints in Corel Draw
#### Overprints in Illustrator
### Example PDF Setup for White Ink
The example Graphic Warehouse logo would be printed onto wood.
#### Expected Finished Output when printed on to Wood
[](https://manual.maticmedia.co.uk/uploads/images/gallery/2022-05/image-1652709147371.png)
#### Example White Layer
[](https://manual.maticmedia.co.uk/uploads/images/gallery/2022-05/image-1652709495870.png)
#### Example CMYK Layer
[](https://manual.maticmedia.co.uk/uploads/images/gallery/2022-05/image-1652709575556.png)
#### Example Downloadable PDF
You can download the above example as a PDF here:
[White Ink Example - Graphic Warehouse.pdf](https://manual.maticmedia.co.uk/attachments/6)
# Pole Pockets
### How to Calculate Required Pocket Size for a Pole
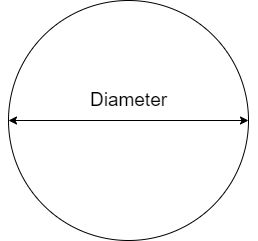
You need to the know the diameter of the pole in millimetres.
#### Pole Diameter
####
Pocket Size Formula
> **Minimum Pocket Size = ((2\*π\*(Diameter / 2))/2) + 5**
So for a 35mm Diameter pole...
> **((2\*3.14\*(35 / 2))/2) + 5 = 59.95mm**
So for a 35mm Diameter pole you would need a 60mm pocket.
#### Required Pocket Size Calculator
Sometimes it's easier just using a calculator! Enter the pole diameter in the box below and it'll automatically calculate the minimum pocket size.
Pole Diameter (mm)
Minimum Pocket Size (mm)
### Setting Up Artwork for a Pole Pocket
#### Setting Up Artwork for a Pocket on Banner
**Pole Pocket Size**
50mm
**Bleed for Join**
25mm
**Trim Bleed**
3mm
##### Example
For a 300mm x 300mm Banner with a 50mm Pocket Top and Bottom the print file size would be
**Formulas**
Width = Trim Bleed + Banner Finished Size + Trim Bleed
Height = Trim Bleed + Bleed for Join + Pole Pocket Size (Top) + Banner Finished Size + Bleed for Join + Pole Pocket Size (Bottom) + Trim Bleed
**Working Example**
Width = 3 + 300 + 3 = 306mm
Height = 3 + 25 + 50 + 300 + 50 + 25 + 3 = 456mm
**Total Print File Size**
306mm x 456mm
##### Image Example
[](https://manual.maticmedia.co.uk/uploads/images/gallery/2022-05/image-1652710363113.png)
##### PDF Template Example
[Banner Pole Pocket 50mm Example.pdf](https://manual.maticmedia.co.uk/attachments/7)
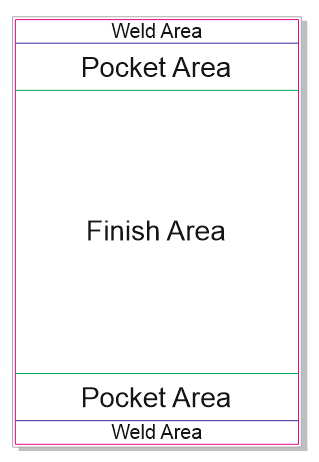
#### Setting Up Artwork for a Double-Sided Pole Pocket Banner
Use the same formula as above for the single-sided, however for double-sided one of the sides must have the 'Pocket Area', 'Hem' and 'Hem Join' kept white (empty). Markers can be added to the print bleed to mark the weld area (to help align with the 'Finish Area')
#### Setting Up Artwork for Pocket on Fabric
**Pole Pocket Size**
50mm
**Bleed for Joining Strip**
10mm
**Trim Bleed**
3mm
##### Example
For a 300mm x 300mm Flag with a 50mm Pocket Top and Bottom the print file size would be
**Formulas**
Width = Trim Bleed + Flag Finished Size + Trim Bleed
Height = Trim Bleed + Bleed for Join + Pole Pocket Size (Top) + Flag Finished Size + Bleed for Join + Pole Pocket Size (Bottom) + Trim Bleed
**Working Example**
Width = 3 + 300 + 3 = 306mm
Height = 3 + 10 + 50 + 300 + 50 + 10 + 3 = 456mm
**Total Print File Size**
306mm x 426mm
# Registration Marks
## When to use your own registration marks
There are instances when you need to set up a print file with its own separate cut file. E.g. specifically to a fit a sheet size rather than using the workflow digital cut system in [Onyx or the MaticTrack. ](https://manual.maticmedia.co.uk/books/artwork-managment/page/adding-cut-lines-digital-cut-marks "Adding Cut Lines / Digital Cut Marks")
#### Scenarios
- Doing an Artwork Layout (Multiple Pieces of artwork Nested together)
- Trying to fit a piece of artwork into a sheet or roll that is an exact fit (example below)
#### Sheet Too Small Example
When using Onyx it usually needs an extra 15mm of bleed all around for the zund marks, in addition to the artwork, so effectively a **2440mm x 1220mm sheet's maximum printing area is 2410mm x 1190mm**, not exactly an efficient use of material.
To get around this you can manually setup a print file and cut file but **you must add your own registration marks** for the finishing methods used with optical recognition..
## Zund Digital Cutter Registration Marks
The following PDFs show examples of how Registration marks can be setup for the Zund Digital Cutter. Registration marks should be put in the Register Layer in a cut file. [You can read about layers for the Zund Digital Cutter here.](https://manual.maticmedia.co.uk/books/zund-g3-flatbed-cutter/page/setting-up-cutter-files "Setting Up Cutter Files")
#### Example Print and Cut File
\[TODO\]
The following example has been set up in InDesign, Illustrator and Corel Draw.
##### InDesign Example
\[TODO\]
##### Illustrator Example
\[TODO\]
##### Corel Draw Example
\[TODO\]
## Summa Cam Registration Marks
Summa Registration marks can be added in illustrator or Corel Draw using the Summa Cut plugin.
#### Plugin Download
#### Plugin Usage (Corel Draw)
#### Plugin Usage (Illustrator)
# Setting Up Double Sided Banners
To set up a double-sided banner, the file should be set up with just a 3mm bleed; if eyelets are requested, they sit 12mm in from the edge as a standard finish.
# Adobe Cloud
We have access to the full suite of Adobe packages through Adobe Cloud subscription. We are limited to licences and this may mean that you are logged out of some features.
**Licence ID**
**Installed On**
**Expires**
robert@maticmedia.co.uk
Roberts Laptop
Richards Laptop
June
adobe2@maticmedia.co.uk
Julia's Laptop
Lesley's Laptop
July
adobe@maticmedia.co.uk
Textile001
March
# Shutterstock
We pay by subscription to Shutterstock. The account is in richard@maticmedia.co.uk's name so password reminders will go to Richard.
For Client proposals, Watermarked images should be used before downloading.
[Username and password in password vault.](https://manual.maticmedia.co.uk/books/security/page/password-manager "Password Manager")
Last Update: 24/08/2022
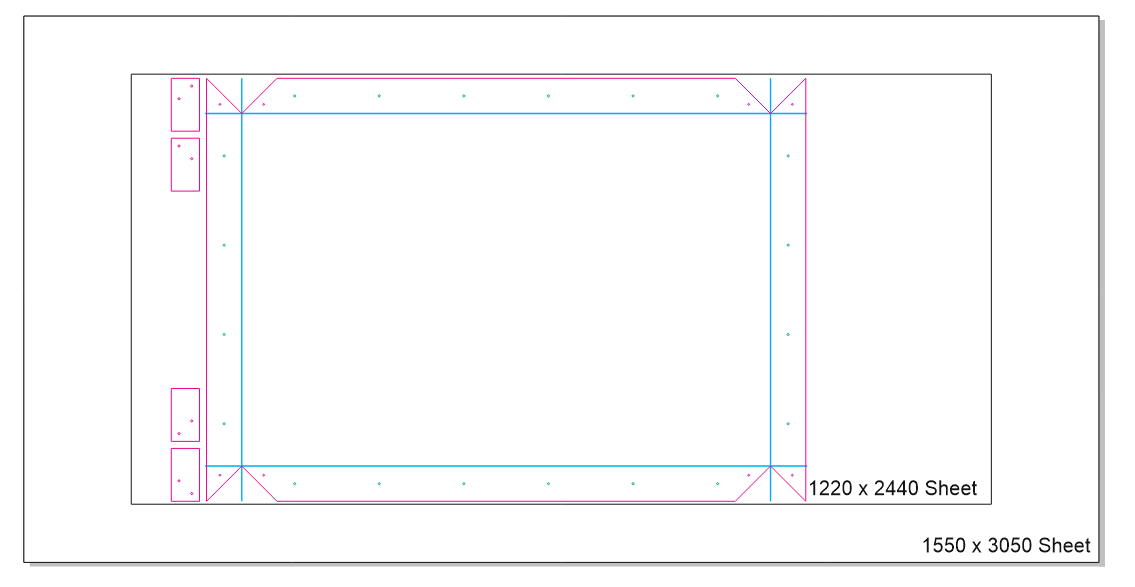
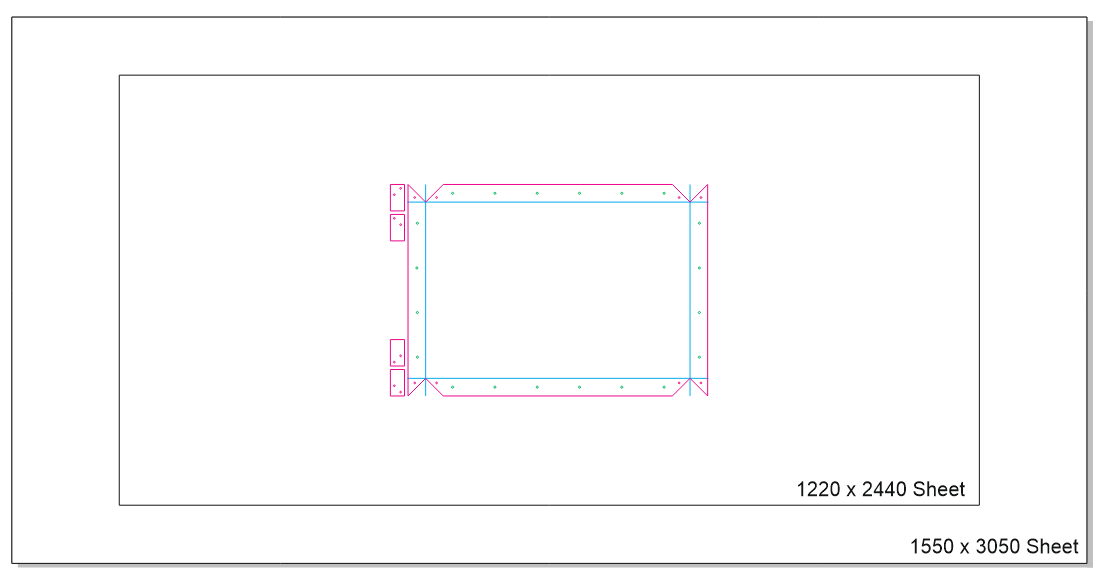
# ACM | Dibond | Aluminium Composite - Folded Box Pans
Usually, returns have either 100mm or 50mm but these may be specified.
- Backlit pans require a minimum of 100mm depth to avoid spotting from the LEDs.
- Sheet sizes are 3050mm x1550mm or 1220mm x 2440mm
- Add 20mm bleed of artwork to allow wrap around edges
Templates can be found here: Z:\\Templates\\Box Pan Templates
### 100mm Returns
[](https://manual.maticmedia.co.uk/uploads/images/gallery/2022-06/image-1656064607570.png)
### 50mm Returns
[](https://manual.maticmedia.co.uk/uploads/images/gallery/2022-06/image-1656064629236.png)
# Bulk Uploading Artwork
Got a pdf with multiple pages of different sizes you need uploaded and allocated to multiple different quote items?
This is what the Bulk Upload Artwork function is for.
#### What does it do...
- Takes a PDF with multiple pages
- Tries to allocate artwork based on the provided bleed to the appropriate quote item
- If the size does not exist it will allocate artwork to a new zero valued quote item
- Automatically Diskcheck, Proof and Approve upload artwork with a quantity of 1
#### How It Works
1. From the quote screen click the Add buttton
[](https://manual.maticmedia.co.uk/uploads/images/gallery/2022-11/image-1668606612400.png)
2. Select the Artwork Items Button
[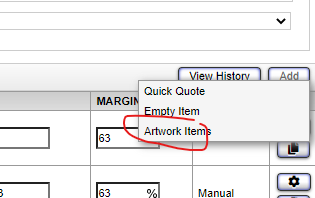](https://manual.maticmedia.co.uk/uploads/images/gallery/2022-11/image-1668606644537.png)
3. Enter the artwork bleed in the input box (in this case the artwork is setup with a 3mm bleed
[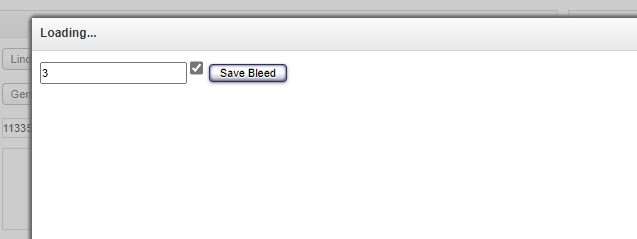](https://manual.maticmedia.co.uk/uploads/images/gallery/2022-11/image-1668606668781.png)
4. Click Save Bleed
[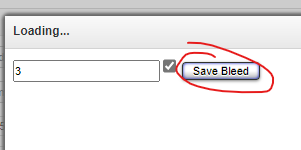](https://manual.maticmedia.co.uk/uploads/images/gallery/2022-11/image-1668606718138.png)
5. Select Upload File
[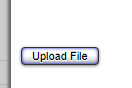](https://manual.maticmedia.co.uk/uploads/images/gallery/2022-11/image-1668606749852.png)
6. The system will try and allocate the artwork based on the artboard size of the artwork
7. Open Quote or Cart frontend view to see the uploaded artwork you can change quantities as you see fit
[](https://manual.maticmedia.co.uk/uploads/images/gallery/2022-11/image-1668606816581.png)
# Fixing artwork off centre / wrong scale
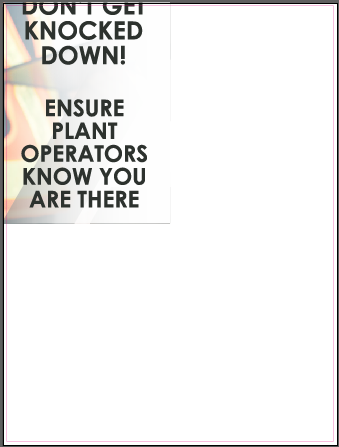
#### **Issue:** The file is not in the centre of the page.
##### *(This can also be used to correct the wrong scale of artwork)*
##### **Adobe Illustrator**
If you have access to **Adobe Illustrator** *(if not scroll down to see the method through Matic Track)* you can open the pdf and the file will look something like this:
*(if you have file issues see here: [Editing a file with mi... | Matic Manual (maticmedia.co.uk)](https://manual.maticmedia.co.uk/books/artwork-management/page/editing-a-file-with-missing-fonts-or-broken-attachments))*
[](https://manual.maticmedia.co.uk/uploads/images/gallery/2023-07/image-1688461641006.png)
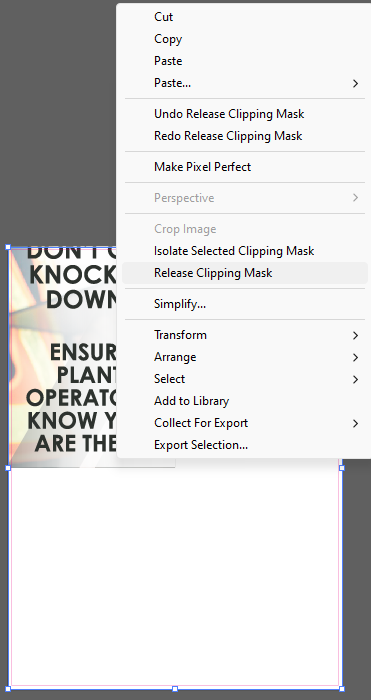
Right-click and release the clipping mask:
[ ](https://manual.maticmedia.co.uk/uploads/images/gallery/2023-07/image-1688461691703.png)[](https://manual.maticmedia.co.uk/uploads/images/gallery/2023-07/image-1688461723772.png)
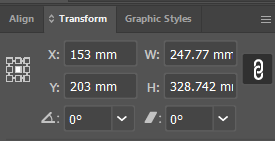
If your file is the wrong size, you can change the size by selecting the artwork and changing the width and height in the Transform tab:
[](https://manual.maticmedia.co.uk/uploads/images/gallery/2023-07/image-1688464944995.png)
[](https://manual.maticmedia.co.uk/uploads/images/gallery/2023-07/image-1688465015740.png)
Align the artwork to the centre of the artboard:
[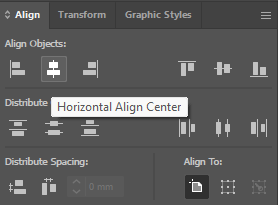 ](https://manual.maticmedia.co.uk/uploads/images/gallery/2023-07/image-1688461818778.png)[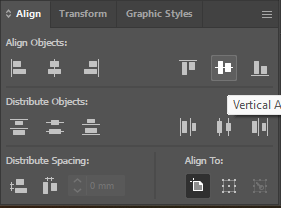](https://manual.maticmedia.co.uk/uploads/images/gallery/2023-07/image-1688461840948.png)
The file should now be centred and then save your file (ctrl+shift+S).
[](https://manual.maticmedia.co.uk/uploads/images/gallery/2023-07/image-1688461871851.png)
#### **Matic Track**
##### Fixing the off-centre file through the Matic Track:
Go to the order page [](https://manual.maticmedia.co.uk/uploads/images/gallery/2023-07/image-1688462327067.png)
Click View Cart:[](https://manual.maticmedia.co.uk/uploads/images/gallery/2023-07/image-1688462277324.png)
Scroll down to cart view (if the artwork doesn't match your order, try right click open the link inprivate window): [](https://manual.maticmedia.co.uk/uploads/images/gallery/2023-07/image-1688462362743.png)
Select edit artwork:
[](https://manual.maticmedia.co.uk/uploads/images/gallery/2023-07/image-1688462485992.png)
Select edit settings:
[](https://manual.maticmedia.co.uk/uploads/images/gallery/2023-07/image-1688462579529.png)
If the size and scale are correct select the position:
*If the file doesn't look right, you can alter the X and Y in bespoke position.*
[](https://manual.maticmedia.co.uk/uploads/images/gallery/2023-07/image-1688462664647.png)
Select next:[](https://manual.maticmedia.co.uk/uploads/images/gallery/2023-07/image-1688463068444.png)
If the file doesn't have a bleed, select edge stretch, which will stretch the last pixel on the edge to fill the bleed. Then select next.
[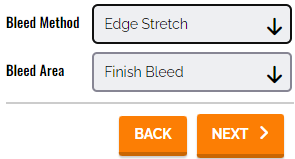](https://manual.maticmedia.co.uk/uploads/images/gallery/2023-07/image-1688463169498.png)
Continue through the next few steps if all are correct.
**Now to process the new file into the folder:**
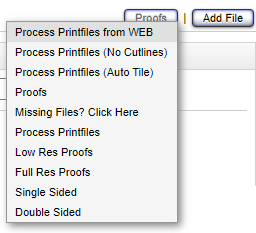
Go back to your matic track and go to view order [](https://manual.maticmedia.co.uk/uploads/images/gallery/2023-07/image-1688463415262.png)
Into artwork [](https://manual.maticmedia.co.uk/uploads/images/gallery/2023-07/image-1688463510218.png)
Process Printfiles from WEB
[](https://manual.maticmedia.co.uk/uploads/images/gallery/2023-07/image-1688463530621.png)
Open up the link in the project info to see the file.
[](https://manual.maticmedia.co.uk/uploads/images/gallery/2023-07/image-1688463575709.png)
# Editing a file with missing fonts or broken attachments
#### **Issue:** The file is missing fonts or broken attachments when opening in adobe illustrator.
[](https://manual.maticmedia.co.uk/uploads/images/gallery/2023-07/image-1688463847883.png)
If your computer does not have the font, we can get around it by placing the file into a new document and flattening the artwork.
Create a new file (to the correct size) and place the artwork that is broken. [](https://manual.maticmedia.co.uk/uploads/images/gallery/2023-07/image-1688463983708.png)*(just click when placing so that the file comes in at 100%)*
Go to **Object** and select **Flatten Transparency...**
[](https://manual.maticmedia.co.uk/uploads/images/gallery/2023-07/image-1688464138647.png)
These settings can vary on the file issue, for **text issues** make sure that converting **All Text to Outlines** is selected.
If you have an **issue with colour** (inverted colours), select **Preserve Alpha Transparency** *(check your spot colours afterwards as this converts them to process).*
[](https://manual.maticmedia.co.uk/uploads/images/gallery/2023-07/image-1688464178538.png)
If you need to make further changes to the file, you will have to now ungroup and release clipping masks.
# Tiling Print Files / Splitting Pop Up Panels
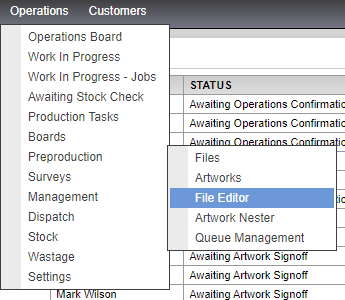
##### **To Split a pop-up system through the Matic Track**
**Operations > Preproduction > File Editor**
[](https://manual.maticmedia.co.uk/uploads/images/gallery/2024-02/image-1708429732881.png)
**Select Add File
> ROOT - PROJECTS
> Search the File with your job no.** *(ctrl+F to search)* **> FOLDER - Production
> FOLDER - TO PRINT
> Select your print file.** [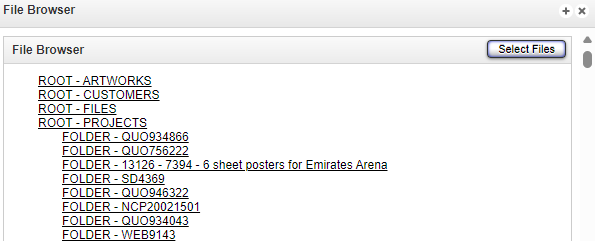](https://manual.maticmedia.co.uk/uploads/images/gallery/2024-02/image-1708429837487.png)
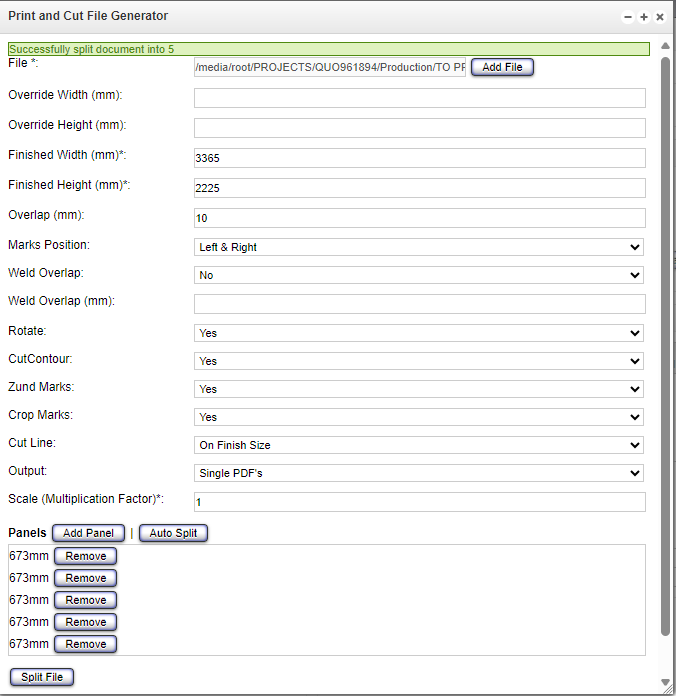
**Add your sizes to the finished width and height.
> Overlap at 10mm** (*otherwise, it'll shorten by 1mm.)* **> Rotate depending on your file rotation, usually NO.
> CutContour, Zund Marks and Crop Marks as YES
> Cut Line on Finish Size.
> Scale usually at 1, depending on your file scale.
> Auto Split
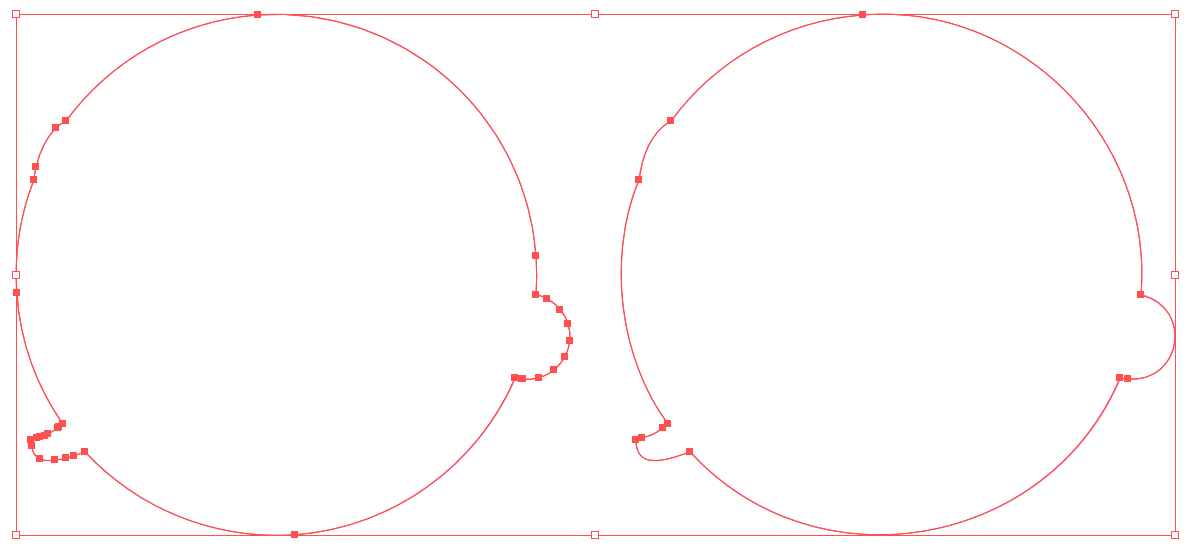
Curved pop-up panels should all be 673mm wide.
Straight pop-ups will have middle panels of 733mm wide and end panels of 673mm wide.** *\*Example of a 3x3 curved popup that needed to be rotated.*
[](https://manual.maticmedia.co.uk/uploads/images/gallery/2024-02/image-1708429706241.png)